


© Mindspill.org. All Right Reserved.

WE PUT THE TECH IN TECHNOLOGY
Revolutionizing computer networks implementation since 2010.
Revolutionizing computer networks implementation since 2010.
100+ CLIENTS
200+ PROJECTS
95% CLIENT RETENTION RATE
Our work recommends us.
200+ PROJECTS
95% CLIENT RETENTION RATE
Our work recommends us.
How to set up File and Printer sharing in Windows
Sometimes, small companies are forced to use peer-to-peer networks, because they can't afford to buy a centralized server. It's a solution that works fine for teams of five people or less, even though it's not one that we'd recommend.
Servers are built with reliability in mind, for example. If your key company data resides on a standard computer, you may discover that it was lost because the standard hard drive that was storing it got damaged.

Servers also have many useful features you won't find in a regular computer, such as redundant power supplies or hot module swapping. You can see why servers are definitely a much better option, and now that we have gotten this out of our way, let's see how you can set up peer-to-peer file and printer sharing.
The first step of the process is to determine the resources that need to be shared. You can share entire drives, or restrict sharing to certain folders, printers, scanners, and so on. Please be careful with choosing the names of the shared resources; things can go wrong if you don't obey the Microsoft naming convention. The Redmond based software developer doesn't want people to use spaces in the network names, for example. So, use regular names that don't include spaces and other weird symbols, which may prevent you from accessing certain resources. Names like "LaserPrinter" are descriptive and won't cause any problems.
Be sure to give each computer a unique name. While some operating systems allow you to use the same name for several devices (they use an internal naming convention, but that's another story) Windows-based networks require unique names for all the computers that belong to the same network.
Small networks use computers which need to join the same workgroup. So, be sure to use the same workgroup name for all the PCs in your network. It is true that it is possible to share files with computers that belong to a different workgroup; however, you shouldn't rely on that.
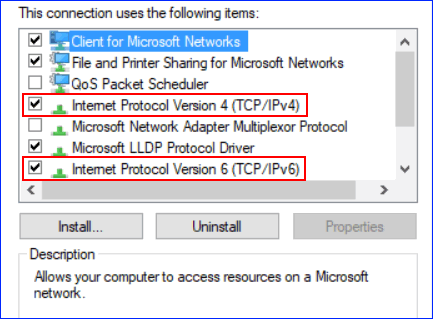
Verify if the TCP/IP protocol is installed on all the computers. It is installed in Windows by default, but sometimes it may miss from a PC, making that particular computer unable to share files or access them.
Resist the temptation to use other protocols, such as IPX/SPX. They are outdated, and they may cause trouble, so it's best to uninstall all the protocols (excepting TCP/IP, of course).
The first step of the process is to determine the resources that need to be shared. You can share entire drives, or restrict sharing to certain folders, printers, scanners, and so on. Please be careful with choosing the names of the shared resources; things can go wrong if you don't obey the Microsoft naming convention. The Redmond based software developer doesn't want people to use spaces in the network names, for example. So, use regular names that don't include spaces and other weird symbols, which may prevent you from accessing certain resources. Names like "LaserPrinter" are descriptive and won't cause any problems.
Be sure to give each computer a unique name. While some operating systems allow you to use the same name for several devices (they use an internal naming convention, but that's another story) Windows-based networks require unique names for all the computers that belong to the same network.
Small networks use computers which need to join the same workgroup. So, be sure to use the same workgroup name for all the PCs in your network. It is true that it is possible to share files with computers that belong to a different workgroup; however, you shouldn't rely on that.
Verify if the TCP/IP protocol is installed on all the computers. It is installed in Windows by default, but sometimes it may miss from a PC, making that particular computer unable to share files or access them.
Resist the temptation to use other protocols, such as IPX/SPX. They are outdated, and they may cause trouble, so it's best to uninstall all the protocols (excepting TCP/IP, of course).
Make sure to use the same subnet mask for all the computers. Its typical value is 255.255.255.0, and it should be the same for every PC in the network. However, the IP addresses should be unique for each network client/computer. Verify that this is true using the ipconfig/all instruction that's run at the command prompt, and then check the "IPv4 address" for each PC.
If you want to share files and printers, you need to have the "file and printer sharing" component of the operating system installed. You can discover this information by examining the network adapter's properties.
If things don't work as expected (or don't work at all) there may be a problem with a firewall. Windows has a built-in firewall, and your antivirus may have another one that's active. Be sure to disable them all while you are testing file and printer sharing, and then activate them, one of the time. A firewall may prevent your computer from accessing other computers and vice versa.
We hope that these tips will be helpful. However, you shouldn't forget that peer-to-peer file and printer sharing services are only as strong as the weakest link in the network. Using a dedicated server is always a much better idea.